Friday, September 25, 2015

Dr Pepper Smoking Chicken

I have been smoking chicken for many years and do pretty well but this recipe is hands down the best I have ever done. I smoked some drumsticks the other day the for some friends and WOWZA, it was great. Juicy, tasty, smokey, and great a few days later even. I didn't get any complaints when I served it up the first time, so I am keeping this in the books.

I will say this recipe takes awhile with about 1 hour prep time, 2 hours for the brine process, and 4 hours for smoking. Pretty much an all day smoke day is required but the results are incredible. If your gonna smoke all day you might as well load up the grill too, right?

This recipe serves 8

Ingredients

  • 8 - chicken drumsticks with skin on
  • 1 cup - brown sugar
  • 1- cup Morton salt
  • 1- liter Dr Pepper
  • 1- Jack Daniels Hickory Barbecue Sauce
  • Country Boy Ole #1 All Purpose seasoning
  • Chef Geoffrey Michael's Spicet
  • Grill Mates Brown Sugar Bourbon Seasoning
Part One - Preparation
When I smoke a chicken, I always brine it first. This will ensure that the meat stays moist and juicy while smoking it for long hours at a time. I highly recommend you learn the process of how to brine. If you google it you will get a variety of methods. Choose one or create your own. I keep it simple and easy and get really great results.

Get your smoker going with charcoal then add hickory and mesquite wood chunks. Get your heat to a steady 200-225 F by controlling the vent door and smoke stack.

In a large plastic or glass container, not metal, large enough to cover the amount chicken you are preparing, mix water and 1 cup Morton salt and 1 cup brown sugar together. Boil the mixture a few minutes to dissolve the salt and sugar. Let the mixture sit to room temp before using. Add thawed chicken, skin on, and cover in the container then refrigerate for 2 hours right before smoking.After 2 hours in the brine, remove the chicken and rinse and pat down the chicken with a paper towel to dry.


Part Two - The Rub
Using Chef Rico's Kicken Chicken Rub, rub the chicken legs down for added flavoring. 1 cup Spicet, 1 cup Brown Sugar Bourbon Seasoning. While holding the drumstick by the leg, push your finger under the skin to pull it away from the chicken forming a pocket if you will. Add a small amount of rub and push it under the skin all over the chicken leg. Then pull the skin back up over the leg.

Part Three - Coating
Now take the drumsticks and coat them with the Jack Daniels Hickory Barbecue Sauce coating all around and up the leg to the end. Coat well! I use a rib rack to place the chicken legs head down for smoking so that the smoke goes all around the leg. Sprinkle the legs yet still with the Country Boy Ole #1 Seasoning lightly for added salty tasting chicken.

Smoke the chicken at 225F for 4 hours using hickory and mesquite wood chucks or small logs.

Part Four - Mopping
Mopping your meat while smoking adds more flavor and keeps the meat from drying out while smoking long periods. For this I used Chef Rico's Dr Pepper Mop Sauce. In a large bowl, mix the rest of the Jack Daniels Hickory Barbecue Sauce and add Dr pepper to it. You want your mixture fairly thin so it covers well. I don't have a measurement for this, I just add and stir until the sauce is watery and thin. Every hour, open the smoker and mop the chicken legs all over from the top down. This is another reason I stand my legs up in a rib rack, so that the mop sauce runs down all over the legs.
Do this the whole smoking time.

Don't under-cook and serve meat of any kind. Always use a thermometer to get the inside of the meat the right temp. Chicken should cook to 165F.

Remove from the grill after 4 hours and place in a foil tray and wrap tight with foil and place in the oven at the around 200F to keep warm until you are ready to serve.


Comments? Suggestions?


Thursday, September 24, 2015

The Making of Chef Rico's Texas Salsa #8

Now and then I get the bug to put up some salsa and talk my wife Becky into it. She is the one with canning knowledge and has to guide me through the process. So tonight we canned 16 jars of my incredibly delicious and addicting Chef Rico's Texas Badboy Salsa #8.

I am attending a MINI event this Saturday and thought I would bring some jars for a small donation (100% of all donations will go toward the Chef Rico Hot Tub Fund). Really? You thought I was serious? I may take a donation for the salsa but give the funds to a charity or something. Or I may just end up giving it away.

So, the process is very interesting and there is definitely an art to canning (one more just popped). You have to heat the salsa, sterilize the lids and jars, fill the jars with salsa, close the lid tight and boil the jars in water. After 10 minutes you pull them out and when the lid pops in from a vacuum, you are ready to slap a label on. (another one popped)


My wife and I were like an assembly line! Next week we are going to the SHARK TANK for some $capital$ and go into sales and marketing. NOT! So, if you get to see me this weekend you may, just maybe, get a jar of Chef Rico's salsa.

We made 12 batches, one at a time, (2 more just popped) just to make sure the ingredients were just right and the taste was consistent with my expectations of my salsa. Quality control is a high priority here at Chef Rico's place.

Comment? Suggestions?

Disclaimer: Chef Rico's Texas Badboy Salsa #8 is made with Texas ingredients and is highly addicting. We are not responsible for counseling as a result from any addictions that may be formed.


Tuesday, July 21, 2015

Shrimp Fajita's

This is one of my all time favorite recipes and it is so quick and simple to make. As you can tell, I don't use a ton of spices. I like meals that are very tasteful, easy to make, and that look great. Presentation is everything when you are cooking. There are two ways to prepare this meal. Prepackaged ingredients or fresh. I prefer the fresh route, but for this post I am giving you the quick and easy way in addition to the fresh way. In this particular recipe I use HEB grocery products. I can give you options if you don't have an HEB near you. Try this one out and comment at the bottom how you like it or not.

This meal serves around 6 adults

INGREDIENTS

  • 1- bag of frozen fajita veggies
  • 1- bag of precooked frozen beef or chicken fajitas 
  • 1- 8 oz can Mexican flavored diced tomatoes  
  • 1/2- lb peeled small shrimp (15-20)
  • 1- bunch cilantro 
  • 1- small bag shredded cheese Mexican mix
  • Chef Rico's Texas salsa ( you should have that ready at all times)
  • 2- limes
  • 1- 8oz sour cream
  • 1 - package medium size tortillas
  • seasoned salt
  • pepper
Quick and Easy Preparation Method:
1. add a little cooking oil to a large skillet and saute the frozen fajita veggies for about 10 minutes or until fully cooked
2. Add in the frozen fajitas
3. Add in the Mexican flavored diced tomatoes
4. Add 1 cup water
5. Add seasoned salt and pepper to your liking
6. Stir and cover on medium heat for 30 minutes stirring occasionally
7. While you are waiting, quarter the 2 limes and medium chop the cilantro
8. Add the shrimp after cooking the fajitas have been cooking at least 30 minutes on medium to low heat
9. Stir in the shrimp and cover again for 5-10 minutes and you are ready to serve

If you are using all fresh ingredients then use the Optional method:

hand cut into strips 1 - green bell pepper, 1- red bell pepper, and 1- white onion
saute over medium heat in cooking oil for 10 minutes or until fully cooked. Cook up fresh fajitas on the grill and then cut into short strips of meat about 3 inches long. Season as cooking with seasoned salt and pepper.

Garnish and serve
Heat the flour tortillas for 30 seconds
Garnish with your chopped cilantro, a dab of sour cream, some shredded cheese, and squeeze a quartered lime over it. For added flavor make up some Chef Rico's Texas salsa and Chef Rico's avocado dip. Spread the avacado dip on the bottom of the tortilla then add the other ingredients. Top with salsa.

Comments? Suggestions?
 

Monday, July 20, 2015

Chef Rico's Beach Boil

I actually tried this for the first time while on a family beach vacation and loved it. I have been looking at a lot of recipes and procedures for this and decided to try it out on the family. Am I glad I did! It was yummy. My recipe is going to be for a large group so adjust it down accordingly if need be.

This recipe will serves 8-10 adults

INGREDIENTS


  • 9 - fresh ears of sweet yellow corn in the shuck
  • 2- large lemons
  • 1- large white onion
  • 1- large pouch Shrimp and crab boil
  • 16 - red potatoes
  • 1 - large sausage link (i used Polska Kiebasa)
  • 2- lbs large shrimp in the shell but headed
  • 1- large beer
  • seasoned salt
  • pepper
  • 1- bottle tarter sauce
  • 1- bottle cocktail sauce
  • 1- 6-7 gallon boiling pot
Preparation method:

1. Fill the boiling pot about 3/4 full. It will take about 45 minutes to get this to a boil depending oon what heating method you are using so start early
2. Add in the Shrimp and Crab boil, the bottle of beer, and the 2 lemons cut in half
3. Add in the white onion peeled and quartered
4. While waiting for the water to boil begin preparing your other ingredients.
5. Cut the sausage into 1 inch pieces and set aside
6. Cut the red potato in half and set aside ( don't peel)
7. Shuck the corn and remove all the strings and set aside. Cut both ends off slightly. Then cut the ears into 2 pieces each

Adding your ingredients:

8. Add the red potatoes - once the water is almost to boil, add the potatoes. Watch the potatoes so they don't get mushy by stirring them and pulling on out to check.
9. After the potatoes have cooked 10-15 minutes, add in the corn
10.After the corn has cooked 10 minutes, add in the sausage
11. Season with salt and pepper to your liking
12. After the sausage has cooked 5 minutes, add in the shrimp
13. Cook another 5-10 minutes and your ready to sample

Total cooking time of the ingredients should be around 45-50 minutes

On a large platter, scoop out your ingredients draining well as you scoop to the platter. Arrange the platter nicely or for fun serve it up on white butcher paper to your guests.

Comments? Suggestions?


Sunday, May 10, 2015

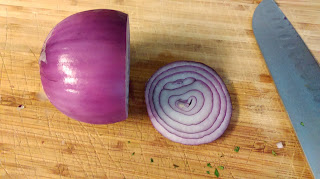
Chef Rico's Perfect Chopped Onion Method

This is a great way to hand chop onions and make them any size you like; fine grade, medium grade, or large grade. You will want different sizes depending on what you are making many times. Plus, this is quick and easy and sets you up for more than one time. Once you slice off how much you need, store the rest in a sealed plastic bag or sealed container.

Start with how you buy the onion at the store. You don't need to peel it just yet!
Take a sharp wide blade knife and cut both ends of the onion off and discard
Score the onion by making  a cut about 1/8 blade deep across the onion
Now peel the onion back to reveal the shinny part like this
Here is where you determine the size of your chop. Slice the onion about 1/4 think and you get large; slice it 1/8 thick and you get medium grade chop; slice it really thin like 1/16 and you get a fine chop.
 Now cut the slice in half and separate to prepare for chopping
As you chop the slice, move it around with your fingers toward the blade. With the onion now in inner circles, when you cut this way, you end up with chopped onion.

Disclaimer: This post is strictly for chopping method purposes only and does not deal with food storage methods or how long to keep foods stored.

Bourbon Steak Marinade

Grilling steaks is on of my all time favorite meats. My son Joey, (culinary student) grilled the one in the picture for me. Notice the grill marks are perfect and he uses a temp sensor to grill to just the right degree for however you like your meat. (Cutting into a steak while grilling will loose the juices and cook unevenly)

My part in this  meal was the steak marinade. I have used this one for a lot of years and I have to say it very different from anything else I have used. Obviously one of the main ingredients is bourbon and the results is incredible flavor. So, if you are your Baptist and don't drink, go to the neighbors house and borrow a shot.

This recipe will marinate up to four 8oz steaks

Ingredients

  • 1- shot Bourbon (please only a shot, more does not make this any better)
  • 1/4 cup brown sugar
  • 1/4 cup soy sauce
  • 1/4 Dijon mustard
  • 1 teaspoon Worcestershire sauce
  • pepper to taste
  • well marbled steak

Preparation method:
1. Combine all the ingredients, except the steaks, in a large mixing bowl and still until well mixed
2. Place your steaks in a large resealable plastic bag
3. Add all the mixture and seal the bag
4. Shake the bag around ensuring the mixture is all over each steak
5. Refrigerate over night for best results

Grill em up!

Comments? Have did you enjoy this recipe?

Chef Rico's Simple Steak Salsa

Have you ever thought of steak salsa? That's the only terminology I can think of for this mixture. We were eating at an outdoor barbeque place in Durango,Colorado many years ago and they used this salsa and I just fell in love with it. After the show they put on for the crowd, I went back to the kitchen and inquired about the salsa. The guy I talked to gave me the recipe with no problem and told me I may be shocked at how simple it is to make. I have made this for over 25 years now and still love it; and YES, IT IS SIMPLE TO MAKE!

This recipe serves around 6-8 people

Ingredients


  • 1- 14.5 oz can diced tomatoes
  • 1 - green bell pepper
  • 1/4 cup chopped white onion (medium chopped)
  • Garlic salt to taste
  • Season Salt to taste ( Kountry Boys Ole #1) is my favorite

1. Pour the diced tomatoes in a large bowl and with two knives back and forth, chop the chunks up smaller.
2. Wash and core the green bell pepper then chop medium size and add to the bowl
3. Chop the white onion smaller and add to the bowl and stir mixture
4. Add the garlic salt to taste. I like mine pretty garlicky!
5. Add the seasoned salt but not too much
6. Stir the mixture well and then refrigerated before using

I told you this was simple but very tasty and awesome on steaks

Comments? Have you tried this yet?

Sunday, March 15, 2015

Chef Rico's Pork Tender Loin Crock

This meal is so simple and so good a kid could cook it. In fact, that is exactly who made it with me this past week. While visiting our grand kids in Missouri, they all helped me cook dinner one night with my Pork Tender Loin recipe. What I absolutely love about this recipe is once you prepare it in the crock pot, you leave it cooking all day and come home to a dee-lish-ous dinner.  

The tenderloin serves 6-8 people so add veggie portions accordingly.

Ingredients

  • 1- Pork Ternder Loin (usually comes in two pieces)
  • 1/2 - medium white onion
  • 2 - small red potatoes per person serving
  • 1/2 cup - fresh carrot per person serving
  • Weber Chicago Steak Seasoning
  • Seasoned salt
  • 2- cans Cream of Mushroom soup

1. Use a crock pot liner for super easy cleanup
2. Rinse the tenderloin with water to remove any blood and place in the crock pot
3. Slice the 1/2 onion in large rings and then cut in half and place on top the tender loin all along the top from one end to the other
4. Add seasoned salt to just lightly dust the top of the tender loin
5. Next cover the top of the tenderloin with the steak seasoning with a solid covering from one end to the other
6. Add 1/4 cup water to one side of the tender loin.
7. Wash the potatoes then quarter them and add to both sides of the tender loin.
8. Peel the carrots then slice to quarter inch thickness and add to the sides of the tender loin.
9. Pour the creme of mushroom soup over the top of the meat and veggies.
10. Cook on LOW for 7-8 hours with the lid on.

Serve with steamed broccoli or green beans and salad for a wonderful and tasty meal. Enjoy!

Tuesday, January 27, 2015

Avocado Dip Rico Style

I have been making this for years and everyone seems to love it so i am sharing my secret. NO more powder packets for me. I use all natural ingredients that turns into a wonderful dip to die for. Depending on the ripeness of the avocados you purchase, you can create the dip a little chunky or just creamy and smooth; your choice.

Ingredients

  • 2 - large avocados
  • 1/4 cup - chopped red onion
  • 1/4 cup - chopped cilantro
  • 1/4 cup - chopped tomato
  • 1/2 - fresh lime
  • pinch of salt
  • pinch of pepper
  • pinch seasoned salt

1. Take the avocado and cut in half and remove the seed
2. Spoon out the inside and place in a large bowl
3. Mash with a fork to the consistency you prefer
4. Add in the chopped cilantro, red onion, and tomato and stir a minute or two mixing well
5. Add in the pinch of salt, pepper, seasoned salt
6. Squeeze the fresh lime juice over the bowl and mix in well and you are done

A GREAT OPTION:


1. Take some boiled eggs and cut in half and remove the yoke.
2. Rinse each half and dry
3. Fill each egg half with the avocado dip
4. Sprinkle with seasoned salt for color and flavor
5. Top with a small amount of shredded cheddar cheese if you like

Tuesday, January 13, 2015

Healthy Quick Pancakes

I reluctantly used the word "healthy" in the recipe name since not much, if anything, I have posted so far is anything close to healthy. But, this one certainly is! This is my wife Becky's recipe and she makes it all the time. One thing she likes is that is is quick and easy to make and IS very good for you. If you are short on time in the mornings on the way to a busy day, try this one and see what you think. Serves 3 small pancakes

Ingredients

  • 1 banana
  • 1 egg (per banana)
  • blueberries


1. Mash banana really good in a bowl
2. Add the egg and stir really good (kids love to help with this)
3. Heat your griddle to 350 degrees F or use a spayed skillet and pour the mixture
4. Sprinkle a few blueberries on top and cook as you would regular pancakes
NOTE:Increase the number of banana for more yield

Be creative...you can add nuts, finely chopped apples, flax seed, cooked bacon bits.
These are so good and sweet enough you don't even need to add syrup.

Sunday, January 11, 2015

The Chef Rico "Texas" Burger

When someone says Texas Burger this is what I think of! Have some fun with your grilling and give your guest a treat by using a Texas burger mold from HEB. The plastic burger mold is easy to use and adds the star in the middle too.
Serves 4-6


Ingredients

  • 2 lbs- lean 90/10 ground beef
  • 6 - saltine crakers
  • 1 tbs - seasoned salt 
  • 1- tbs pepper
  • 2 tbs - Worcestershire Sauce
  • 1 - egg
  • 1/3 cup - chopped white onion
  • Weber Gourmet Burger seasoning

1. In a large mixing bowl add the ground beef and all the ingredients.
2. Crumble up the crackers using a rolling pin then adding to the mixture
3. Knead the mixture into a large ball with your hand
4. Separate out smaller balls the size of a small orange
5. Place the ball of meat in the Texas burger mold
6. Flip the mold up side down and the Texas patty will fall out
7. Grill to perfection on gas or charcoal. If using charcoal, add a few small wood chunks like mesquite to add flavor.
8. Cover the burgers while on the grill with the Weber Gourmet Burger seasoning just on one side
9. Take the buns and lightly butter the inside top and bottom part.
10. Lay face down on the open fire way maybe a couple minutes just enough to toast the buns and brown the inside.
11. Serve hot and ready to assymble


Saturday, January 10, 2015

Two Texas Cowboys

Great employees are hard to find sometimes but these two fit the bill with excellence. Actually I really don't have employees, just great friends like these two guys. They catered my daughters wedding many years ago grilling up some real Texas backyard barbeque that was to die for.

Meet Jim Morgan and Barry Canter of North Texas. These two guys are dear and close friends and when I mentioned I needed a caterer, so I could spend time with my guests, they jumped at the opportunity to help me out. They bought all the food, arrived early to start smoking and grilling and cooking, prepared all the fixins, and even served the food then stayed for cleanup. WOW!

Friends just don't get any better than these two Texas cowboys! 

Friday, January 9, 2015

Texas Fish Tacos

There are a million ways to fix Fish Tacos. Just try googling it and you would see. Doesn't really matter though, this is the right way to fix them in Texas. I use talapia and broil it in the oven or grill it. Grilling fish is a little tricky so I normally end up baking it.
Serves 8

Ingredients

  • 4 - fish filet's 
  • butter
  • seasoned salt
  • 1- lemon
  • 1/4 cup - chopped cilantro
  • 1/2 - red cabbage
  • 1/2 - green cabbage
  • 1/2 cup- chopped white onion
  • 1/2 cup - shredded cheddar cheese
  • 8- medium flour tortillas
  • 1- 4oz plain yogurt
  • 4oz - miracle whip
  • 1- lime

First make the special sauce so you can refrigerate it before serving

1. In a mixing bowl add the yogurt, Miracle whip, and squeeze 1/2 of a lime. Stir well and whisk until smooth and creamy. Refrigerate

Second prepare the fish

1. Prepare the fish in a baking pan lined with foil
2. Spoon butter over the top of each filet
3. Sprinkle with seasoned salt
4. Sprinkle with course chopped cilantro
5. Slice the lemon and place one slice on each filet or more if you have extra slices
6. Broil in the oven for about 12 minutes
7. While the fish is baking prepare the other ingredients

Third prepare the toppings

1. Chop up the white onion place in small bowl
2. Shred the cheese course and place in small bowl
3. Shred the red and green cabbage and mix together in a bowl. Shred and slice this in strips
4. Chop up the cilantro and place in a small bowl

Putting it all together

1. When the fish is done. Check for flakiness with a fork. Flaky means done.
2. Slice the fish into short strips
3. Set the special sauce out
3. Heat the tortillas hot and add fish and toppings and sauce and get ready for delicious.

Thursday, January 8, 2015

Grilled Pork Chops

Now that is a pork chop!
Grilled pork chops are fairly easy to grill up and don't take a long time to cook. I use my gas grill for this most the time for ease and because it has a searing burner. A searing burner is usually a long burner with flames on both side that throws out a lot of heat at once. I turn the burners on with the searing burner and when I am ready to grill, I sear the chops on both sides for about 3 minutes. That will close the pours of the meat and hold in the flavor and juices more. This method works very well on steaks as well.

Ingredients

  • 4 - center cut extra thick pork chops
  • seasoned salt
  • pepper
  • Italian dressing
  • Weber Chicago Steak Seasoning
  • 2- large zip lock bags

The key to this meat is preparation. If frozen, let thaw first. Fresh chops are the best of you have a local meat market close by.

1. Place 2 chops per zip lock bag
2. Pour or squirt Italian Dressing in each bag to cover the chops with some excess.
3. Close up the bag and move the chops around by turning the bag up and down to get the dressing all over the pork.
4. Chill over night in the fridge.
5. On grill day, place the chops in a pan and season with seasoned salt lightly
6. Add a little pepper as well to each chop
7. With the Chicago Steak seasoning, completely cover one side of each pork chop.
8. Place on the grill, searing burner first for 3 minutes each side.
9. Remove from searing burner to the regular grill grate area
10. Cook on low heat with the lid down for 15 minutes each side
11. Using a food thermometer cook until the center reaches 160 degrees F
NOTE: I highly recommend a gauge or digital food thermometer for grilling
12. Remove from grill and serve

Chef Rico's 12 Seasoning Spaghetti Sauce

I have been making this recipe for years and every time I serve it, I get asked for the recipe. I can only remember one time I gave this out to a friend and he loved it. I guess it is time to share and reveal my secret sauce recipe.
Serves 4

NOTE: I used this recipe on my wife for dinner when I proposed to her in 1976 and we have been married 38 years so I would say it worked. Not that she married me for my spaghetti sauce or anything! The 12 seasonings do not make any sense, they just somehow work together to make this unique and delicious. Bon a petite!

Ingredients

  • 1 lb - lean 90/10 ground beef
  • 1- 14.5 oz can stewed tomato's
  • 2 - 8 oz cans tomato sauce
  • 1 - 6 oz can tomato paste
  • 1/4 cup - ketchup
  • whole parsley stem
  • chopped parsley
  • 1 ts of each of the following:
  • salt
  • pepper
  • ground nutmeg
  • ground cloves
  • rubbed sage
  • garlic salt
  • ground oregeno
  • basil leaves
  • seasoned salt
  • italian seasoning
  • minced onion
  • paprika

1. In a large skillet, brown the lean meat until no red or pink is showing
2. Add in the stewed tomato
3. Add in the tomato sauce
4. Add in the tomato paste
5. Add in 14.5 oz of water (the empty stewed tomato can)
6. Stir around mixing it well
7. Add in each of the 12 seasonings one by one
8. Stir that around really well
9. Bring to a boil, then cover and simmer on low for 1 hour
10. Check the sauce a few times to stir

Presentation is everything...

Do not mix the sauce and pasta in the skillet together. Place the pasta on the plate, scoop the sauce over the pasta leaving some pasta showing around the edges. Place a 3 in stem of parsley under the outside edge of the pasta. Make sure you do not spill sauce on the edge of the plate anywhere. Last sprinkle your chopped parsley over the center lightly for added color.

Enjoy!

Wednesday, January 7, 2015

Chef Rico's Texas Grilled Avocados with Mango Salsa

This is a Cadden family favorite and a Texas tradition for sure and will compliment any backyard grill. Whoever thought this one up is a genius and should get an award for flavor and texture. Be careful how you pick your avocados for this...they need to be on the hard side when purchased and certainly not soft. The bigger the better!


Ingredients

  • 1- red bell pepper
  • 1- yellow bell pepper
  • 1- green bell pepper
  • 1- large mango
  • 1- white onion
  • chopped cilantro
  • fresh shredded mild cheddar cheese
  • several limes
  • seasoned salt 
  • pepper
  • Chef Rico's Texas Style Salsa or any mild salsa

1. Finely chop each of the bell peppers and mix together in a bowl
2. Finely chop the white onion and add
3. Take the mango and peel it then slice in downwards making large slices. There is a seed in the middle that is hard to remove so just carve around it. Add that to the mixture in the bowl
4. Quarter a lime and squeeze all four parts into the mix
5. Stir all this together well for your mango salsa
6. Next chop the cilantro for a topping
7. Shred the cheddar cheese course for a topping
8. Take the avocado halves and in the last 15 minutes of grilling your meat, place them flat side down directly over the heat source, gas or charcoal.
9. Grill until the avocado has grill marks and blackened.
10. Remove from the grill and in the hole where the seed was, spoon in your mango salsa to just fill the hole.
12. Use a pinch of seasoned salt and pepper over the top
11. Sprinkle with shredded cheese, chopped cilantro, and using a quarter of a lime, squeeze the juice across the avocados.

Serve warm and eat with a spoon


Hickory Smoked Honey Ham

Who doesn't like ham? ...and hickory smoked to boot! This recipe is one of my all time favorites. Very simple and only takes about 4 hours to smoke. The flavor is incredible and makes you moan and groan after every bite...man this is good! Obviously requires a good smoker and some hickory fire wood.You have to try this one for sure!  Serves 8


Ingredients

  • 1- spiral cut pre-cooked honey ham from HEB
  • 1- packet of honey glaze
  • 1- packet of honey glaze powder mix
  • 1- large can of pineapple chucks in water
  • 1- large aluminum grilling pan
1. Prepare the smoker by starting the fire with charcoal for keeping the fire going longer
2. Add oak fire wood to build the heat base
3. Once the fire is hot and coals are red, add the hickory fire wood on top the fire.
NOTE: for more smoke, you can pre-soak the hickory in water over night in a tub in the backyard
4. While the smoker is starting up place the ham in the aluminum pan
5. Add 1 cup water
6. Pour the pineapple chunks and juice over the top of the ham. Don't worry if it all falls to the side
7. Get the smoker to around 225 F degrees smoking. You just want to slow smoke this since the ham is pre-cooked.
8. Place the ham on the smoker for 4 hours. Maintain the fire to keep the temp around your mark by adjusting the smoke stack or fire box door. Add hickory wood as needed.
9. With the ham you get the two packets of glaze and powder. Put the glaze packet in the microwave for about a minute. In the raw it is thick and hard to stir; the micro will make it softer.
10. Now mix the packet of powder and stir until the powder is mixed well.
11. In the last hour of smoking pour this glaze over the ham on the smoker and leave.

Remove the ham in four hours and carve and serve.Season as you like but just like this is really good.

 
NOTE: Save the juice in the pan after smoking to pour over the ham on the serving tray for added flavor leaving the smoked pineapple on top the ham for serving. Enjoy!

Serve with Chef Rico's Yellow Potato Salad

Chef Rico's Texas Style Jalapeno Burger

For real Texans only!

Chef Rico's Award Winning Homeade Ice Cream

I took first place with this recipe in an ice cream contest at church. Those Baptist's loved it! I have to confess the owner of this recipe though and give her all the credit. The recipe I have used for over 10 years came from Linda Holland, Food Service Director at Glenview Baptist Church in Fort Worth, Texas. This is so simple to make but so freakin delicious. Serves 8

I ate it, I loved it, I want some more of it!

Ingredients

  • 6- eggs
  • 2- cups sugar
  • 1  - can Eagle Brand Sweetened condensed milk
  • 3 tbs - vanilla extract
  • milk

1. In your homemade ice cream maker canister add in the 6 eggs
2. Add in the sugar
3. Add in the condensed milk
4. Add in the vanilla extract
5. Stir this really well until it is smooth and creamy
6. Add milk to the fill line marked on the inside side of the canister
7. Close the lid up and place the filled canister into the maker barrel.
8 Churn until the motor stops, adding in crushed ice and Morton's Ice Cream Salt as needed.

NOTE: special flavoring can be added as desired. I always make vanilla but add to it. My award winning combination was homemade vanilla with Heath Bar chopped up and added in the mix.

Kelly's Chocolate Malted Chip Cookies

WOWZA...these are incredible cookies. Did I mention they have chocolate in them? Kelly is one of our Administrative Assistants at the office and she made these one day and brought them to the office for a few minutes. I mean that's about how long they lasted before we all gobbled them up. Wait till you see the ingredients and you will know why they are scrumptious! THANK YOU KELLY for sharing the recipe.


Ingredients


  • 1cup -  butter - flavored shortening
  • 1 1/4 cup - packed brown sugar
  • 1/2 cup - VANILLA malted milk powder ( that's right, use vanilla)
  • 2 tbs- chocolate syrup
  • 1 tbs - vanilla extract

  • 1- egg
  • 2 cups - all-purpose flour
  • 1 ts - baking soda
  • 1/2 ts - salt
  • 1 1/2 cups - semi-sweet chocolate chunks
  • 1 cup - 6oz milk chocolate chips

1. In a mixing bowl, combine the first 5 ingredients and beat 2 minutes
2. Add the egg
3. Combine the flour, baking soda and salt and gradually add to the creamed mixture mixing well after each ingredient
4. Stir in the chocolate chunks and chips
5. Shape into 2 inch balls and place 3 inches apart on an un-greased baking sheets
6. Bake at 375 for 12- 14 minutes or until golden brown
NOTE: for more chewy results reduce cooking time a few minutes
7. Cool for 2 minutes before removing to a wire rack.
Makes about 1 1/2 dozen large cookies


Pioneer Pancakes

I am not a complicated cook by any means but instead look for the best way to serve up delicious food with great taste and flavor. One of my all time favorites, according to my 7 grand kids, are my pancakes and the best ever. The adults even love them!

I have used a Presto 20" electric griddle for 100 years and it works extremely well for pancakes and other breakfast items. Non stick surface and super easy cleanup. I set it to 350 degrees and let it heat up for a few minutes before starting.

As you can see from the pic, I also cater large groups!

Ingredients


  • Pioneer Brand Original Buttermilk Pancake and Waffle mix (red label box)
  • Eggs
  • Milk
  • Oil

1. Mix according to the box instructions and according to the amount of pancakes you wish to make.
2. Mix all the ingredients in a large mixing bowl and using a whisk, make sure there is no powder showing.
3. Adjust your texture by adding more milk or more powder mix. The thicker the mix, the thicker your pancakes will be.
4. Using a small measuring cup, dip in the bowl and pour the mix on the griddle in any size you like
5. Clean up is a wipe of the griddle with a clean wet washrag.

NOTE: the store mixes that just add water to the powder are not the same as this brand. The eggs, milk, and oil make a huge difference in taste and quality.

HINT: use a pizza cutting wheel to cut up the pancakes for little ones.


Tuesday, January 6, 2015

Real Chili Texas Style

Some say real Texas chili has no beans in it. I say "hogwash". My Texas chili is full of beans and is one of the best recipes around and loved by everyone. The toppings are what add a distinctive taste and look only to Texas. Chili recipe by Becky Cadden. Serves 8

Ingredients


  • 1- can red beans drained
  • 1- can black beans drained
  • 1- can light red kidney beans drained
  • 1- can dark beans drained
  • 1- can ranch beans drained
  • 1- 1.25 oz packet Mild Chili mix
  • small Frito's
  • Chopped white onion
  • Chopped cilantro
  • Sour cream
  • Chef Rico's Texas Salsa or Pace Picante sauce 
  • 1- lb lean hamburger meat
  •  Several limes quartered

1. In a large skillet brown the hamburger meat
2. In a large pot add the browned hamburger meat and all the drained cans of beans. Add the packet of Chili Mix and stir together
3. Cook on medium to low for 30 minutes
That is all you have to do for the chili. Simple and easy and very tasty

Toppings

4. I do it in this order but some like the Frito's on the bottom first.
5. In your serving bowl add the chili half full of the bowl
6. Place on the chili in this order:
Frito's, chopped onion, chopped cilantro, salsa, scoop of sour cream, and then squeeze a quarter of a lime over the top of the whole bowl. Enjoy!

A great compliment to my chili is Texas Style Corn yellow cornbread mix from HEB 6oz pack.


Chef Rico's Texas Yellow Potato Salad

Ingredients

  • Regular brown skin potatoes - NOTE: use 1 small potato per person 
  • 1/2 cup of chopped white onion
  • 1/2 cup of chopped celery
  • 1/3 cup of chopped large seeded black olives
  • 1/3 cup of chopped whole green olives
  • 1/3 cup of chopped cilantro 
  • 1/3 cup of chopped dill pickles
  • Seasoned salt
  • Miracle Whip
  • Mustard 4 - Boiled eggs

Serves 8

1. Peel and rinse the potatoes then quarter and place in large pot of water and bring to a boil. Cook until the quarters are still in tack but slightly soft.
NOTE: you want the potatoes to stay chunky while mixing the ingredients in.
NOTE: add the eggs in with the potatoes to boil together so the eggs will be ready when the potatoes are.
2. Drain the potatoes when done and let cool for 5 minutes.
3. Add all the ingredients except the miracle whip and mustard.
4. Under running cold water, peel the boiled eggs. Use two whole eggs to chop up and add. Save two for later whole.
5. With all the ingredients in, now add in 2 cups miracle whip and start stirring the mixing together really well. Add Miracle whip as needed to make the mixture wet and smooth looking not dry. Using a wooden spoon to stir with will help keep the potatoes in chunks.
6. Once you have the texture as you like it, add in mustard just enough to color the whole mixture all over.
7. Now place the potato salad in your serving dish and smooth, covering the whole dish. Cut the remaining two eggs into slices with the yellow yoke intact and place all around the top of the salad.
8. Sprinkle the top with seasoned salt for color and taste. Sprinkle  the chopped cilantro over all that and you are done. Wrap with clear Cling Wrap and refrigerate until ready to serve.

This has been a Cadden family favorite for many years at barbeques.


Chef Rico's Texas Badboy Salsa #8


Ingredients

  • 1- 14.5 oz can Diced Tomatoes Mexican Style
  • 1/3 cup chopped white onion
  • 1/3 cup fresh chopped cilantro
  • 1/2 jalapeno (optional)
  • 1/2 lime
  • pinch of Cumin Powder
  • pinch of salt
  • pinch of pepper


I use a small food processor or a blender will work. Start with the diced tomatoes pouring the whole can in the processor.  
NOTE: for less juicy salsa drain the tomatoes before using.
1. Cut the white onion into chucks measuring 1/3 cup and throw in the processor.
2. Cut a section of the cilantro measuring 1/3 cup stems and all and place in the processor.
3. Cut the jalapeno in half and throw in the processor.  
NOTE: for milder salsa de-seed the jalapeno
4. Quarter the lime and then squeeze 2 quarters in the processor
5. Next add the a pinch of the last three ingredients. A pinch in very small and fits between two fingers. Too much of the last three ingredients will ruin the salsa.
6.Once you have all the ingredients in the processor or blender, use a medium speed for about 15 seconds or just enough that all the ingredients are chopped up.

OPTIONS:
No jalapeno is mild
Add jalapeno is hot = #8 level hot

Serve as is or chilled with non-flavored corn chips. Enjoy!